My family was recently gifted some lovely French salts. This got me thinking how little I really knew about salts. When to use them? Which ones to use? Wouldn’t the little Morton girl do for everything? So I did a little research.
One thing about salt is, once you put it in you can not take it out. Salt can not be smelled, only tasted. So, over salting is a mistake. No one wants to feel like they have just taken in a mouthful of saltwater.
When to add the salt depends on what is being made. A pinch of salt should be added to the boiling water when making pasta and rice. This allows it to be absorbed into the food. Salt should be added to vegetables at the end of cooking as it draws out the moisture in the vegetables. Beans should be soaked overnight in salty water before cooking or sprinkled at the end of cooking not while cooking, as this will make them tough. Meat should be salted when raw. Once the meat starts cooking, the cells close up and the meat can not absorb the flavors as well. Soup is the easy one. Salt distributes evenly in soup and can be added to soup at any time.
Common table salt and iodized table salt are one in the same. Iodized table salt has iodine, an important nutrient, added to provide an easy source of iodine to a person’s diet. However, there is no taste difference and the usage is the same. Chemicals are usually added to table salt to keep it from absorbing moisture and letting it be able to be sprinkled in salt containers. This is the cheapest form of salt.
Kosher salt is used in curing meats. It dissolves well and can be used the same as would common table salt . It’s crystals are larger in size than that of common table salt.
Sea salt is obviously obtained from the sea. It contains mineral salts like magnesium, calcium, and potassium. These minerals give it a stronger, more complex flavor. The minerals also give it a greyish color. Sel gris is a type of sea salt from France which is collected from clay-lined salt ponds off the coast. It is slightly wet in texture. Fleur de sel is the delicate crystals that form on on the surface of evaporating sel gris marshes. This form does not come in contact with the clay and is clear in color. The Fleur de sel is skimmed off the top of the water by hand using special rakes. Fleur de sel is the top of the line in salt, which accounts for it being more pricey to purchase and is a special occasion salt. It is best added to a dish directly before serving. It is regarded as one of the best finishing salts often used on caramels for it’s crunchy crystal texture.
Sel grisFleur de sel
After trying Sel gris and Fleur de sel, I have to say I am a fan. These salts have more flavor and texture than the little Morton girl. I would say they are surely salts to be found in a Master Chef’s kitchen. Proper seasoning can immensely improve a dish. Bon Appetit!
When we went to Maui a few years back, we decided to try Hawaiian Shave Ice. We stopped by Ululani’s Hawaiian Shave Ice for our first tasting experience. (https://www.ululanishawaiianshaveice.com) Having never eaten it before, we found it interesting and fun. It was indeed delicious!
In Hawaii, Hawaiian Shave Ice is served in a cute little plastic cup that resembles a flower. The shave ice is served on top of ice cream (I chose macadamia nut.) and flavored syrup is poured into the ice. Indeed a cool, refreshing treat.
At Ululani’s, the syrup comes in so many flavors it is hard to choose. The syrup also comes in sugar-free flavors for those wanting to cut down on their sugar intake. There is macadamia nut ice cream and toppings to add to the final creation as well. Plan to go back another day to try more flavors.
When we got home we looked for a Shave Ice place. We found one! Now when we want a little taste of the islands, we can head on over for a little Shave Ice and dream of being back in paradise. No, it is not Hawaii, but it does bring back the memories. Aloha!
Our version of Ululani’sBringing back the memories….Ice cream and flavored shave ice in one bite. Yum!
My first attempt at making the pretty little French Macaron went pretty well. The Macaron, after all, has a reputation of not being the easiest to make. Mine were fairly similar in size and the coloring wasn’t bad, they had feet, and most importantly, they tasted good.
I got a few tips on making the French treats from a recent episode of Master Chef. From the show I learned the importance of sifting the flour and pounding the cookie sheet after piping the batter. I also learned that the Macarons should have feet and should maintain their bright colors and not brown during baking. Some of the chefs had their cookies stick to the cooking mats. I read that parchment paper was a better choice. I must say I agree. My Macarons had no problems with the parchment paper.
I found a recipe for Macarons and decided to give it a try. The ingredients are simple… almond flour, powdered sugar, granulated sugar, egg whites, cream of tartar, vanilla, and food coloring to give it that fun look. The biggest job was sifting the almond flour since almond flour tends to be a bit on the moist side. After what seemed like hours, the almond flour was sifted. Next, I beat the egg whites to a peak and gently folded in the dry ingredients. I was now ready to pipe the Macarons onto cookie sheets covered with parchment paper. Then the sheets were pounded/dropped to get rid of potential air bubbles. The Macarons were then left to rest for 40 minutes and finally, put into the oven to bake. After seven minutes in the oven, the pan was turned for even cooking. The Macarons must be cooked until they do not move when touched, but no longer, or they will brown, losing their pretty color. This was the tricky part. It only takes, in my estimate, 30 seconds to 1 minute to over bake the Macarons, so one must be very watchful so they do not over-bake. The recipe called for 12-15 minutes baking time. Mine took on the lower end of this. I would say about 10-11 minutes was about right.
Macarons restingBaked Macarons
After the Macarons cooled, I made a buttercream frosting for the filling. Next time, I would like to experiment with flavored fillings. Maybe raspberry! A ganache would also be a nice filling to try.
Voila! Filled Macarons
While there is always room for improvement, I think my first attempt at making Macarons was a success. Next time, I will know to watch the bake time even more carefully. I can not wait to experiment with new flavors and colors. Bon Appetit!
I like to protect my cell phone before putting it into my bag by slipping it into a woven pouch. I custom made my woven pouch to fit my particular phone. This was a fun and inexpensive way to get exactly what I needed. I recently got a request to make another.
Here is how to make a lined woven pouch. It’s uses are endless. The size of the pouch depends on the size loom that is designed. A great feature of this loom is that the weaving is done in the round using both sides of the board. When done weaving the front it is flipped over and the weaving continues on the back and then flipped to the front and so on. There are no seams to this pouch. When done weaving, the top is tied off and it is a complete pouch. Let’s begin…
Supply List:
Matt Board
Self-healing cutting board
Utility Knife
Ruler
Triangle
Pencil
Scissors
Black Perle Cotton Embroidery Thread on spool
Bent needle (with eye large enough for yarn)
Yarn (all sizes and textures)
Muslin cotton fabric (for lining)
Thread (to match lining)
Sewing Machine
Hand sewing needle
Straight Pins
Iron/Ironing Board
Making the loom
First, decide how big the pouch needs to be. If making for an object, such as a cell phone, place the object on the mat board and measure half an inch on all side around the object. This will be the size of the loom plus add 2 1/4″ additional length . On the top edge measure down 1/8″ and draw a pencil line. Along this line, make small marks every 1/8″. Make these same marks on the bottom as well. Make a line across where you will stop weaving with pencil.
On a self-healing cutting board, use a utility knife to cut out the loom. Next, cut the small marks along the top of the loom. These will be the notches that will hold the warp threads in place. DO NOT cut the marks made on the bottom of the loom. These are for placement of warp threads only and should not be cut as the pouch would not be able to be removed from the loom.
Cutting notches
Now it is time to attach the warp threads to the loom. Start at the upper right corner. Place the black perle cotton thread in the first notch. Hold the tail of the thread to the side with your left hand. Come down the back and up the front through the same notch. Go around the back from this notch across to the next notch and down the front and up the back always returning to the same notch and repeating the process. Follow in this manner until the loom is warped and on the end wrap around the notch and cut the thread.
Using Perle Cotton to Warp the boardDown the back and up the front returning to same notch.Going from notch to notch Ready to weave
Now onto weaving the pouch. Thread the bent needle with about 2 yards of yarn. Weave in an under / over pattern through the warp threads starting at the bottom right and working to the left. Leave a tail of yarn where first weaving stitch was taken. Once at the end of the row, flip the loom over and continue weaving. After weaving the front and back once, flip the loom over and start weaving on the front side again starting on the opposite side of the warp thread that has been previously woven. For example: if the first row was begun with going under the warp thread, now the weaving must begin by going over the warp thread. Never should weaving be the same in touching rows. The pattern will always change as you turn to the front side of the loom.
Weaving in progress
As the rows are woven, they need to be pushed down using the tips of your fingers to form very tight rows. The warp threads should not be highly visible. Keep working the rows down to eventually cover the bottom thickness of the mat board as well. This is important so that no warp threads are visible at the bottom of the finished pouch.
Push rows down to cover bottom thickness of mat board
To change colors or add more thread, weave a little back stitch row using the same under/over pattern as the row it covers. This is the only time to use the same pattern, so that the weaving stitches will blend in when pushed close. See pictures.
Back-stitching to change colorsPush back-stitching down-weaving stitches should matchDone weaving
When the weaving hits the pencil mark that is the finish line for weaving, simply stop weaving and cut the yarn leaving a tail. This tail will be woven into the pouch but leave it for now. With scissors, cut two warp threads close to the notch. Take the threads and tie together in a knot on the last yarn row that was woven.
Time to cut warp threads and tie off
Now turn the loom over and cut two threads and tie in a knot in the same method. Repeat this process of cutting two threads and tying until all threads are cut and tied. If an odd number of threads remain, no worries, just tie three threads together and carry on. Now, very gently, slid the pouch off the loom.
All tied-off and ready to slip off loom
Cut all warp threads short and close to knot. Thread the yarn tail onto the slanted needle and weave through a few rows of woven stitches on the inside of pouch. This will not show on the outside of bag.
Warp threads cut short / Weaving yarn tail on inside to secure
Thread the tail of the bottom of bag and make a loop to form a knot. Pull yarn through loop pulling a knot close to bottom of bag. Clip yarn tail off with scissors. The pouch is finished and now the lining can be added.
Knotting end tail
Take a piece of muslin and fold in half. The fold line will be the bottom of the lining. Lay the pouch on top of the muslin. Bottom of pouch should line up with fold line. Leave a half inch of muslin around all three sides of pouch. Mark and cut fabric to size.
Lining Fabric
Pin two sides of muslin sew seams with sewing machine. Before sewing second seam, be sure the muslin lining and the pouch will match up width-wise for hand sewing them together. If they do not, adjustments may need to be made to the sewing seam allowance. Turn the lining to right side so no seams will be visible. Measure down half an inch on upper edge and turn under to wrong side and iron in place.
Lining fabric turned right side out / Measuring half inch to turn under and iron
Take a sewing needle and thread, Slip stitch the top of lining to the top of pouch. Be sure to fold the top of pouch so the cut warp stitches are tucked under and stitch to the fold of the lining. See photo.
Hand slip-stitching lining to woven pouch
When the lining and pouch are sewn together, tuck/stuff the lining into the pouch. No seams should be visible in the lining. Voila! (If there are any questions, please leave in the comments.)
Lined Pouch compete – ready to tuck lining into pouch and useFinished pouchOther examples of various sizes
We’ve all driven around and seen the green utility boxes by the side of the road. Some cities have programs for artists to paint the boxes. They do this to beautify the city but also to help prevent graffiti. Some of these boxes look better than others. But I was awestruck at the latest form of art I spotted on the utility boxes. Photography!
Lee Sie Photography creates photographic designs that are used as wraps for utility boxes. The photos used in the wraps are of nature, or outdoor scenes that would blend in with the surroundings. They can be found throughout San Diego in such places as Solana Beach. I like the look of them compared to that of some of the painted boxes because they have a clean, professional look. The first one I saw, I was like, “wow” that looks like a photograph, which is exactly what it was. Take a look…
While watching Master Chef on television, I have found some new techniques to try at home. The show has made me realize that there are many ways to cook the same thing, some better than others. This led me to my latest attempt to cook the perfect steak.
On the show, the chefs are always ‘finishing it in the oven’. Hmm…. this is a thought. So, I did a little research on cooking the perfect steak. It should be crispy on the outside, yet juicy and tender on the inside. Usually, I use a grill pan and I must confess to sometimes over grilling my meat. Juicy…not so much.
So, I set out to make the perfect steak and I think I nailed it. First of all the steak should not be one of those super thin things. A little thickness is a good thing. Next, a cast iron skillet is needed. I put my cast iron skillet over medium heat until a drop of water thrown on it sizzled. Then I added canola oil to coat the pan. I lightly salted the steaks and placed them in the pan. The steaks need to sear for 2-3 minutes per side. Next, I added about 2 Tbsp of butter to baste. To the butter I added the seasoning, a bit of garlic and thyme. After flipping the steaks over, with a spoon, I basted the steaks with the butter while the second side seared. (Add more butter if it cooks away. The pan should not be dry.) Then, like my Master Chef chefs, I finished it in the oven (350 degrees for about 5 minutes).
The family all agreed that the steaks were cooked to perfection. Surely the best steaks I have ever made. They turned out juicy and slightly pink on the inside. Proving once again that there is always something new to learn in the kitchen.
Many years ago, I started an avocado tree from the seed of a store bought avocado. Why? It seemed interesting. My mother also found this interesting and since she likes avocados, gave it a try as well.
I saved the seed from an avocado. I then took 3 toothpicks and poked them into the sides of the seed so that it could be put into a cup to sprout roots. It is important for the avocado seed’s bottom (flatter end) to be placed in the water and the top (pointier end) kept dry and above water. As the roots and plant form, the seed will crack and shed it’s outer layer. This is normal. Keep changing out the water daily, so the plant has fresh water. If the roots get too long, a bigger cup may be necessary.
My avocado experiment – avocado seeds in various stagesavocado shoot and root form
When the plant has grown to about 10 inches, it is time to plant in soil. If fruit is desired, planting two avocado trees would be suggested for pollination purposes. Be sure to put a wire cage around the plant to protect it from animals. It will be vulnerable at this stage. I also recommend staking the plant, as it will be subject to snapping with such a thin stem/trunk. Be sure to cover the tree in the winter months if frost is in the forecast. The addition of a citrus fruit fertilizer will also be helpful to the growth of the tree.
My avocado tree did not survive because I did not have a cage around it, as I now suggest would be a wise idea. Rabbits find the young leaves delightful. I decided at the time to stick to pineapples. However, my mother’s two avocado plants did survive and one is now fruiting. How exciting! So, growing your own avocado plant can work, just be sure to protect it from rabbits or other hungry animals when it is young.
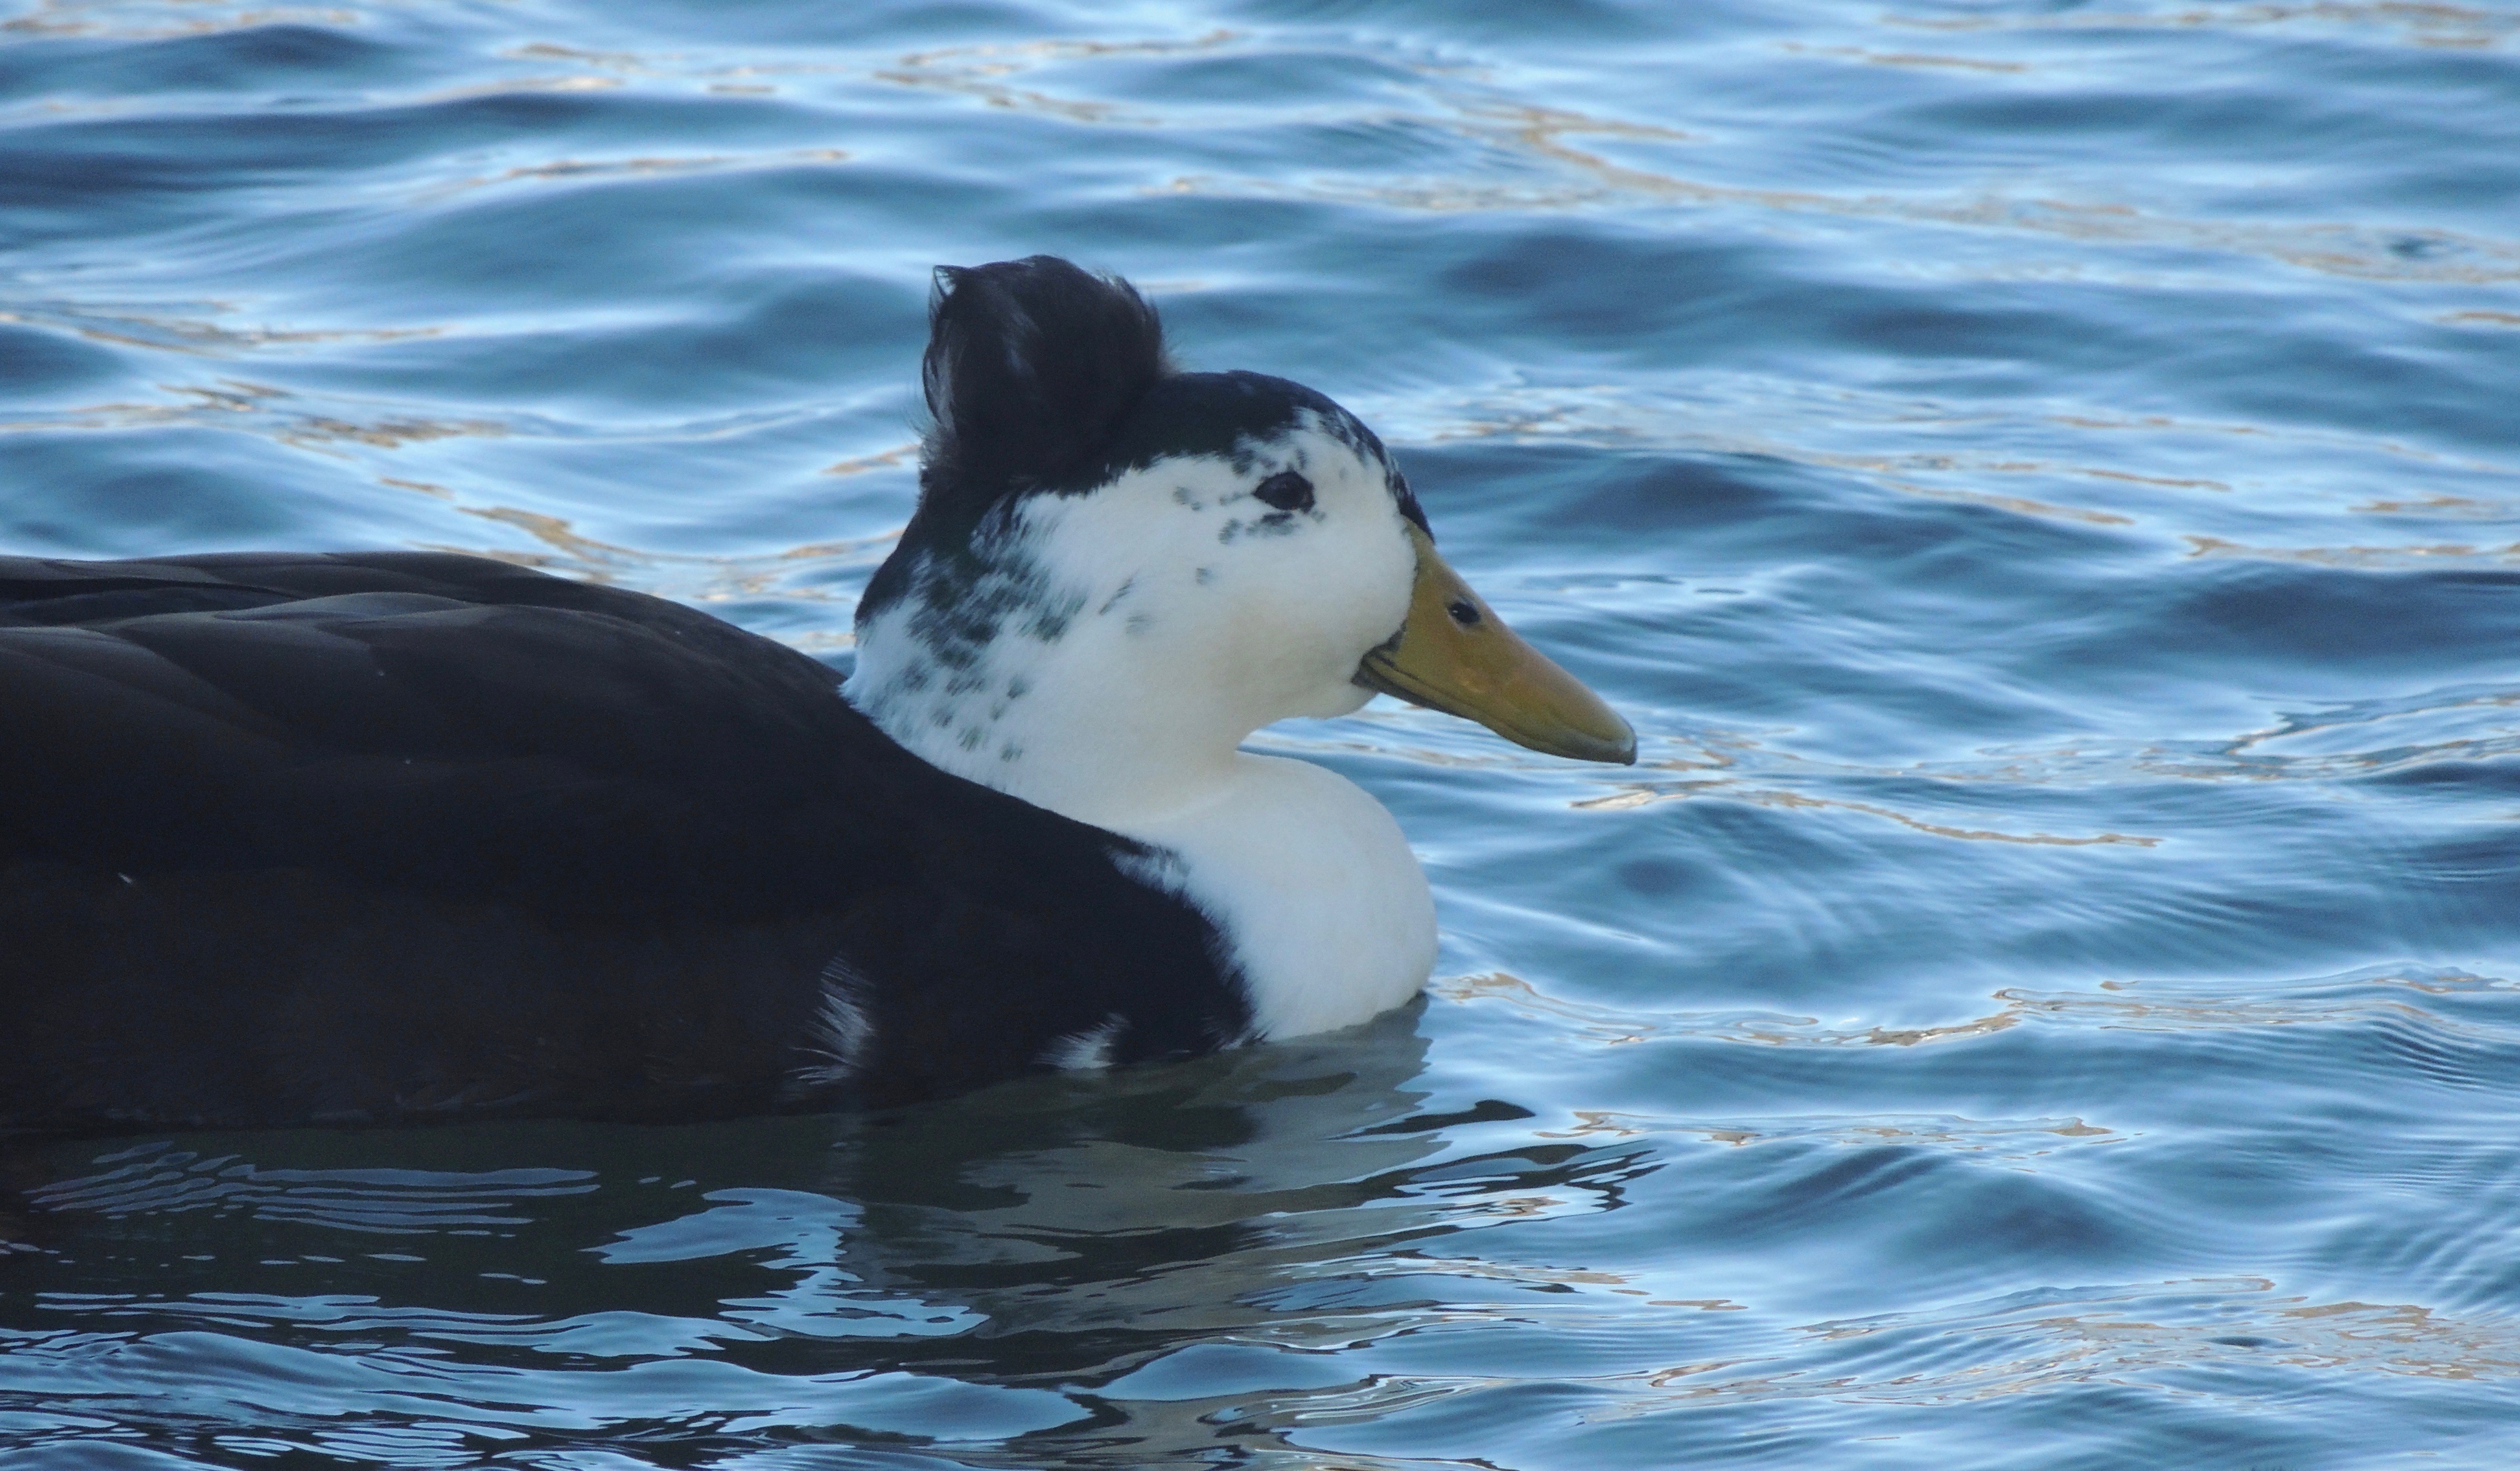
My children and I always enjoyed seeing the same two ducks at the lake. We could spot them a mile away due to the pouf of feathers on top of their heads. Were they just having a bad feather day every day? No, they were born like that. They are what is known as crested ducks.
Crested Duck
In crested ducks, the crested gene is a genetic defect. According to backyardchickens.com, the crest (or what I call the pouf) is actually fatty tissue covering a gap in the skull. Oh my! Breeding crested ducks is considered cruel by many as the chance is greater that the chicks will die in the shell due to this genetic defect. If bred, the chicks have a better chance at survival if one parent does not have the defect.
I never knew this before. Sometimes it is worth the while to look up things one is curious about. It could lead to a new appreciation or understanding of a subject. Defect and all, these crested ducks will always have a place in my heart.
I like to enjoy a good cup of coffee on a cold night. Something warm and soothing. However, it is summer and the temperatures are rising. Somehow settling down with a warm cup of coffee doesn’t sound so tempting. Make mine a cold brew please.
I had my first cold brew at a cute little coffee house that is no longer in existence. Coffee over ice with a straw. It was refreshing and sort of like iced tea in a way, only stronger. At some point I decided I should try this at home. It is so simple to make it seems silly to pay someone else to make one.
I purchased a Cold Brew Infuser Kit by Craft Connections Co. It consists of a 64 oz. Ball Mason Jar and lid with a stainless steel filter basket. It also came with a recipe book if I ever chose to get really fancy with my coffee. I also bought some French Roast coffee beans that I ground myself.
To make the Cold Brew Coffee:
Grind coffee beans and fill the filter basket with 3/4 cup of course grind coffee.
Pour 4 cups of room temperature water down the center of the filter basket over the ground coffee.
Put lid on jar and give the jar a gentle shake.
Let the jar steep for 12-18 hours in the refrigerator.
Remove the filter basket and pour a glass of coffee in a glass over ice.
Store remaining coffee in refrigerator.
Enjoy!
Apparently, the Cold Brew Infuser Kit can also be used to infuse fresh fruit into water. That sounds like something tempting to try! Also, I read where cold brew coffee is better for acid-reflux sufferers. It has less acid than hot brewed coffee. This has to do with the beans not being heated. Worth a shot!
It is mid July and we have spotted our first glimpse of our newest baby bluebird. The parents have been nesting for a while so we have been waiting for this day. Now that the day has come we could not be more thrilled!
Baby Bluebird
We have had baby Western Bluebirds (Sialia mexicana) now for the past few years. Ever since my husband made and gifted me a bluebird house, the birds have come to make their nest and raise their babies. Both the male and female bird help to prepare the nest and take care of the young.
Daddy BluebirdMommy Bluebird in Action
It is such a treat to watch the activities of this newly formed family. The parents are very attentive to their babies and can be seen flying to and from the nest throughout the day with food for their young. Welcome Bluebird family!